

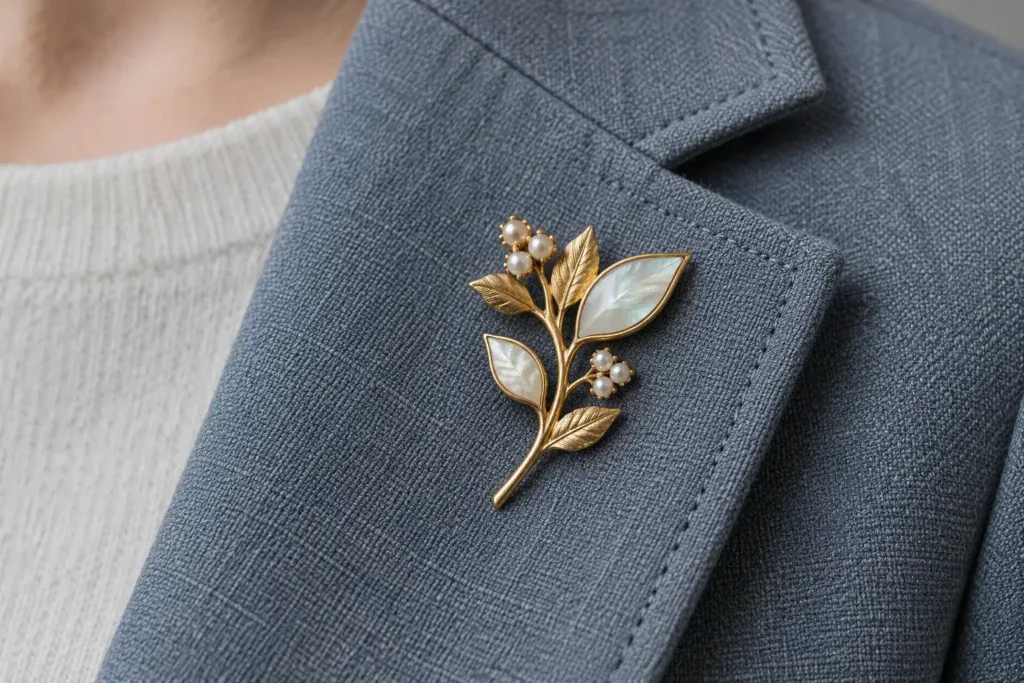
The outfit is ready, and a new brooch seems like the perfect finishing touch. But once it is pinned on, it tips forward and the fabric begins to bunch. After straightening it, a few steps are enough to prompt another check in the mirror. Is it pinned in the wrong spot? Is the fabric struggling to support it? Will moving it leave more pinholes?
Leaving a favorite brooch in its box feels like a waste, but nobody wants to damage a favorite garment either. Tips such as adding felt, switching to a magnetic fastening or changing the position can sound promising. Before trying them, though, one question needs answering: what is actually going wrong, and which part of the problem would each adjustment solve?
A brooch can be securely fastened and still sit badly or pull the fabric out of shape. Even with the pin clasp closed, the brooch may tip forward. It can also remain fixed to the same spot while the surrounding fabric sags with it. Checking only whether it might fall off can miss both problems.
This guide starts with those visible differences, then explains how to assess the placement, the back of the brooch and the fastening. It looks at what common fixes can change and where their limits lie, so readers can decide what is worth adjusting—and when a different brooch or garment makes more sense.
Is Your Brooch Shifting, Tipping Forward or Pulling the Fabric Down?
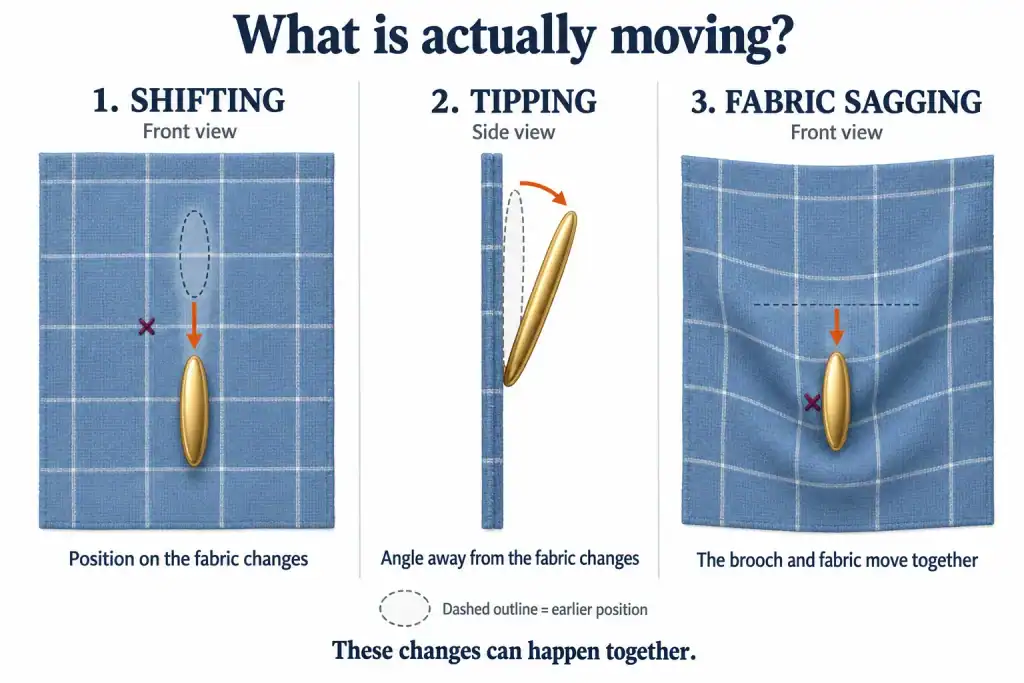
A brooch sitting lower than before does not automatically mean its clasp has come loose. If the whole garment slips on the shoulder, the brooch moves down with it even when the fastening stays put. The useful comparison is between the brooch and the fabric immediately around it—not just its height on the body.
Choose a nearby seam, part of a pattern or a recognizable detail in the weave as a reference. Compare how it looks just after fastening and after normal movement, using a similar posture and viewing angle. Front and side photos can make changes easier to spot. There is no need to mark the garment or tug on the brooch to test it.
| What is changing? | What to look for | What to check next |
|---|---|---|
| The brooch shifts on the fabric | The nearby pattern or weave stays roughly the same shape, but the brooch changes position relative to it. | Check whether the fastening has moved or loosened. With a pin fastening, also inspect the fabric around the entry and exit points for elongated holes or snags. Movement alone does not prove the clasp has opened. |
| The brooch tips forward | From the side, the top leans farther away from the fabric than it did initially. Its height may barely change. | Check whether the brooch is tilting relative to the cloth or the cloth is folding forward with it. Then examine the fastening position on the back and the support around it. Tipping alone does not prove the brooch is too heavy. |
| The fabric sags with the brooch | The brooch stays beside the same detail in the fabric, while nearby stripes, weave lines or edges develop a new bend, dip or downward pull. | Check whether that part of the garment can retain its shape. A clasp that stays closed does not necessarily keep the surrounding fabric flat. |
Two details matter here. A three-dimensional brooch may naturally stand away from the fabric; the question is whether its angle changes during wear. Existing folds are not automatically signs of strain either. Look for changes that appear or become more pronounced after attaching the brooch or moving around.
These changes can happen together, and they do not necessarily mean the garment is permanently damaged. But if pinholes are visibly stretching or threads have snagged, stop wearing the brooch. Open the fastening and remove it carefully, without pulling against caught threads or repeatedly trying new positions.
That gives each observation a useful next step: if the brooch shifts against the cloth, inspect the fastening area; if its angle changes, inspect the back and the local support; if the cloth sags with it, reconsider the placement or the pairing rather than focusing only on the clasp.
Which Fabrics Should You Avoid Pinning a Brooch To?
A material can be strong enough to hold a brooch and still be a poor choice to puncture. Start with two questions: would a visible pinhole be acceptable, and can this part of the garment support the brooch without changing shape?
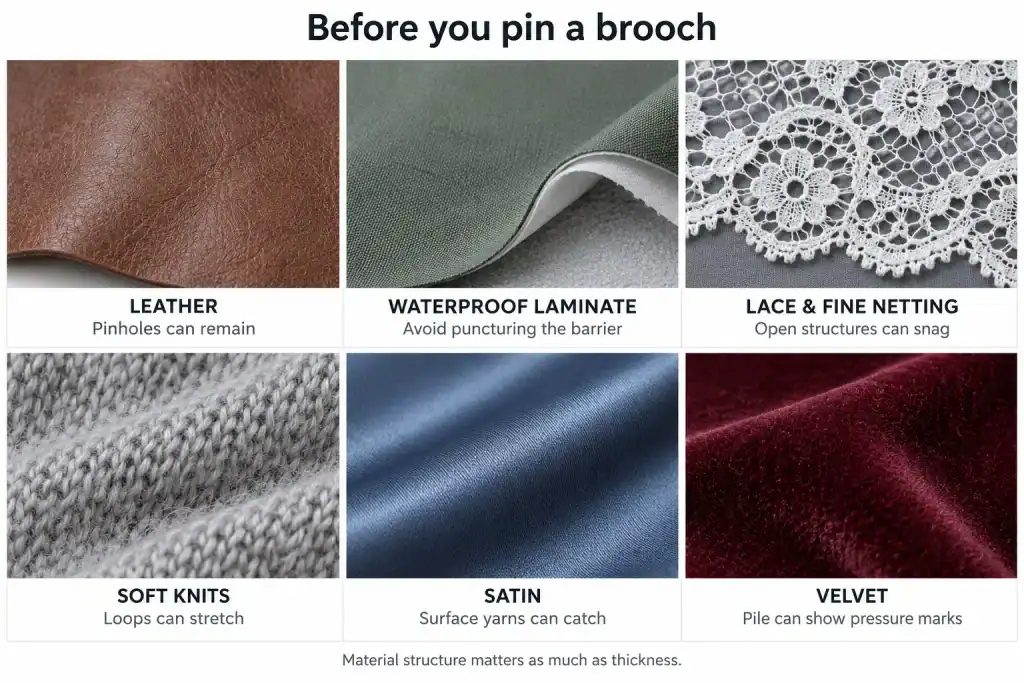
For leather, vinyl and waterproof membranes, the puncture itself is a reason to reconsider. With delicate or flexible textiles, the concern may instead be snagging, distortion or a change in the surface finish.
| Material or fabric structure | What can go wrong | Practical choice |
|---|---|---|
| Leather, faux leather and vinyl | A pin can leave a lasting hole. The material feeling substantial does not make that hole disappear after removal. | Avoid a pin fastening when preserving an unmarked surface matters. SINGER specifically warns that pins leave permanent holes in leather and related specialty materials. SINGER guidance |
| Waterproof membrane fabrics | A puncture can affect the garment’s waterproof barrier, even if the surrounding fabric still looks sound. | Avoid piercing the waterproof layer for decoration. GORE-TEX warns that small, unsealed needle holes can compromise waterproof protection. GORE-TEX guidance |
| Delicate lace and fine netting | Open structures can snag or tear, leaving only a few threads carrying the load. | A pin fitting through an existing opening does not make an unsupported lace panel suitable. |
| Fine, soft or loosely knitted fabrics | Knitted loops can stretch and distort; a chunky-looking knit can still be loose and flexible. | Reconsider the pairing if the brooch visibly pulls that area out of shape. |
| Satin | Long yarns exposed at the surface can be displaced, changing its appearance and sheen. | Avoid prominent areas if even a small surface mark would be unacceptable. |
| Velvet | Raised surface fibers can be crushed or disturbed, leaving visible marks. | Assess pressure as well as punctures, including with fastenings that do not pierce the fabric. |
The Canadian Conservation Institute describes these textile vulnerabilities. Its conservation guidance does not establish safe brooch weights. CCI textile guidance
Fiber names alone are not enough. A loose wool knit behaves differently from dense wool cloth. Satin is a weave, so its surface risks also apply when it is made from fibers other than silk.
For a possible wearing position, look for an area that holds its shape and has suitable support behind it. Check the actual construction rather than assuming that every lapel, seam or folded edge is reinforced. If the garment is already fraying, thinning or splitting—or any lasting mark would be unacceptable—choose another pairing instead of using it to test a fastening.
Why Does a Lightweight Brooch Still Tip Forward?
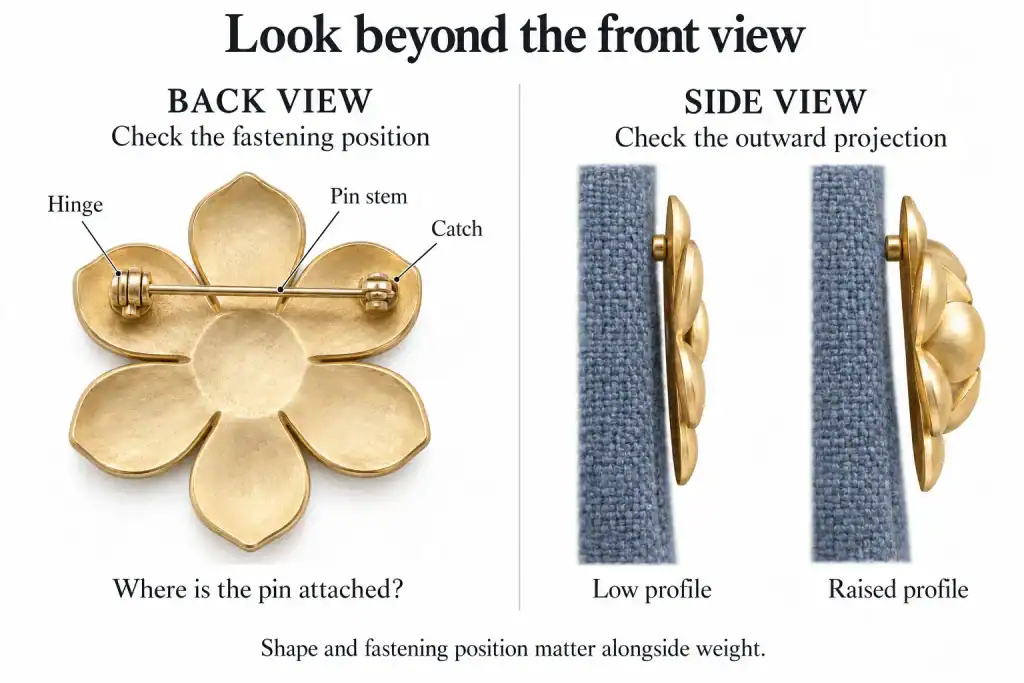
Weight tells only part of the story. Where that weight sits and how the brooch is supported also matter. A clasp can stay firmly closed while the decorative front leans away from the garment.
Turn the brooch over, then look at it from the side. These views reveal details that a front-facing product photo cannot.
Check the fastening position and the outward projection. Neither weight nor a front view tells the whole story.
Start with where the pin sits on the brooch. For a conventional horizontal pin, consider whether the heavier parts sit above or below it. A heavy top supported from below can become more unstable as it leans. Supporting the main weight from above can help it hang more steadily. This applies the principle of stable and unstable balance; it does not mean a high pin position guarantees a good fit.
The outline alone cannot show the weight distribution: a hollow flower and a solid stone may look similarly substantial. The intended wearing angle and contact with the garment also affect how the piece sits.
There are also two different meanings of “pin it higher.” Moving the whole brooch higher on a jacket may find a more supportive area, but it does not move the fastening higher on the brooch’s back.
Then check how far the weight projects outward. Imagine holding a shopping bag beside the body, then extending the arm. The bag has not become heavier, but it creates a greater turning effect at the shoulder. Physics calls this effect torque. OpenStax, Torque.
For a brooch tipping around a horizontal attachment, the same principle applies: moving its weight farther outward increases gravity’s turning effect, other things being equal. A deep setting or raised decoration is therefore worth examining. Its outermost edge is only a clue, though; a large hollow detail may contain little weight.
Finally, watch the cloth behind the fastening. Fabric can bend and distort under a load, as the Canadian Conservation Institute explains in its textile guidance. If the cloth folds outward, the fastening can tilt with it even while remaining closed. CCI, Caring for Textiles and Costumes.
Look from the side: is the brooch changing angle relative to the cloth immediately behind it, or are the cloth and fastening folding outward together? Both can happen. This observation helps decide what to inspect next; it does not prove a single cause. If the fabric is folding, a tighter clasp alone does not address that lack of support.
Before buying another “lighter” brooch, ask for its weight, a back view and a side view in the intended wearing position. A lighter piece may help, but those extra views make it easier to judge whether the problem is likely to follow the replacement.
Can a Felt Backing Stop a Brooch From Drooping?
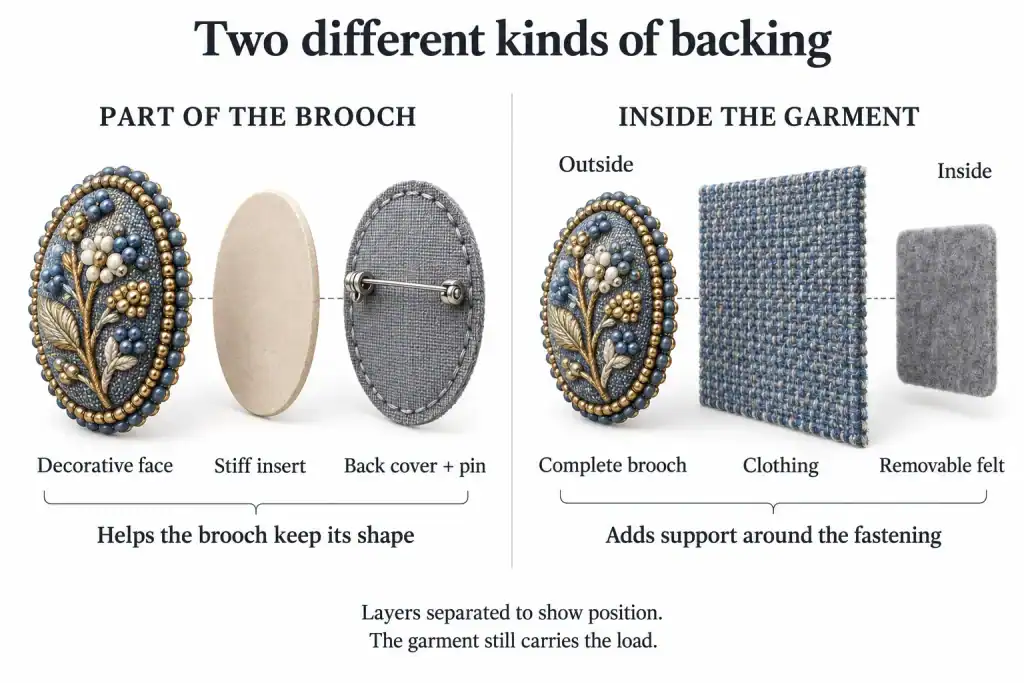
A backing can help a brooch sit more upright without solving the pull on the garment. Before adding one, distinguish between two different places where “backing” may be used.
- Inside the brooch: a stiff insert can help a flexible beaded or fabric brooch keep its own shape. It does not reinforce the clothing.
- Inside the garment: a separate piece of felt is caught by the brooch pin along with the clothing. Depending on the pad and how it is secured, it may make the area around the fastening less flexible.
A discussion in Reddit’s r/Beading community illustrates the difference. A maker’s narrow brooch already contained cardboard to keep it from being floppy, yet it tipped when worn. The maker later reported that doubled felt on the inside of the clothing helped it stand upright. That is one wearer’s result, with no verified weight, fabric specification or long-term assessment.
Even when the angle improves, the clothing still carries the load. A removable pad does not transfer the brooch’s weight to some separate support. The garment carries both the brooch and the pad. A small supported area can therefore remain relatively flat while the softer fabric around it sags.
The Canadian Conservation Institute documents textile distortion caused by the weight of attached decoration. Its examples concern heritage textiles, so they support the underlying concern rather than establish a safe brooch weight for everyday clothing.
For a garment that is otherwise suitable for pinning, consider a removable pad before a permanent alteration. Position a smooth piece of felt inside the garment so the pin catches both layers. Keep it concealed behind the brooch and use only a thickness that allows the pin to close fully without forcing or bunching the layers. Felt placed loosely nearby is not secured as part of the fastening.
Then check both the brooch and the surrounding fabric:
| What changes? | What it tells you |
|---|---|
| The brooch sits more upright and the surrounding fabric retains its shape. | The pad appears to help in this pairing. Check again during wear; a good initial fit is not a guarantee. |
| The brooch stands straighter, but the fabric and pad sag together. | Its angle improved, but the combination still pulls the garment out of shape at that location. |
| The pad shows through, creates a ridge or makes the clasp difficult to close. | The added bulk introduces another problem. Do not keep adding layers. |
If the whole area still drops, consider a more supportive location or a different brooch and garment combination. More padding is not automatically more support. Felt also does not make leather, waterproof membranes or other materials that should not be punctured suitable for a pin.
Are Magnetic or Clip-On Brooches Better for Delicate Clothes?
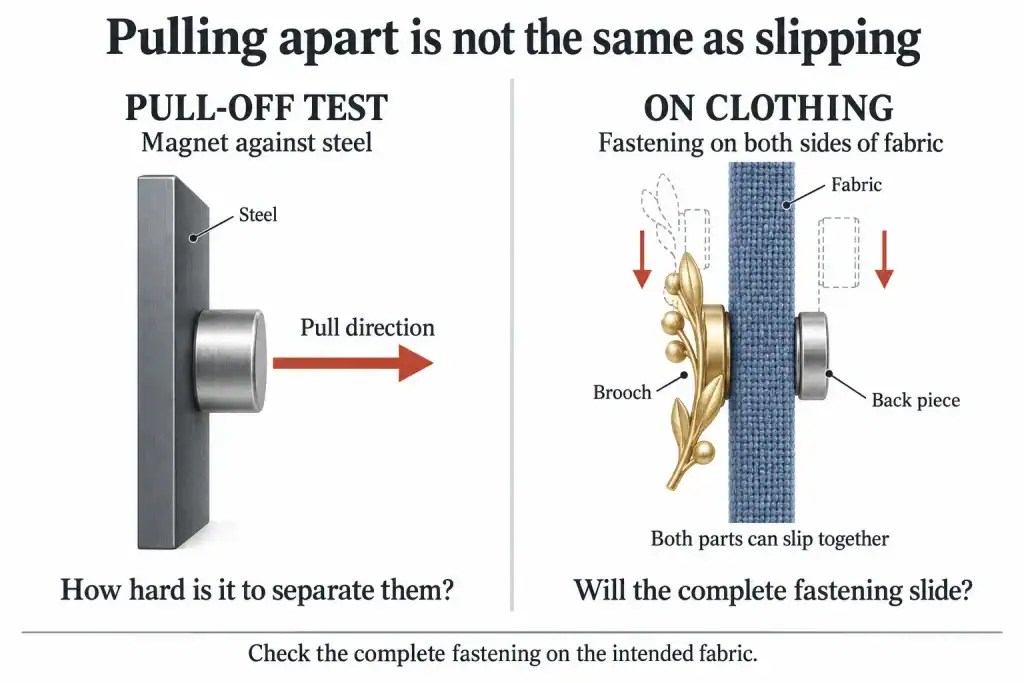
Avoiding a pinhole is only one part of protecting a garment. Magnets and clips change how the brooch grips the fabric; the clothing still has to carry its weight.
| Fastening | When it may be worth considering | What still needs checking |
|---|---|---|
| Pin and catch | The fabric is suitable for pinning and the brooch needs to sit away from an edge. | Needle condition, secure closure and distortion around the pierced area. |
| Magnetic fastening | Avoiding punctures is a priority and both sides of the garment are accessible. | Grip through the actual fabric, downward slipping and pressure marks. |
| Smooth-jaw clip | A suitable edge or fold fits comfortably between the jaws. | Whether it grips without crushing, creasing or sliding off the material. |
For magnets, “hard to pull apart” does not mean “unable to slide down.” A published pull-force rating can describe a magnet pulled directly off a steel plate. It does not automatically tell how much jewelry the complete fastening can hold on clothing.
The brooch and its back piece can move downward together without separating. Friction helps resist that movement, and it depends on the contacting surfaces and how firmly they are pressed together. This is an application of the friction principle described by OpenStax, not a tested weight limit for brooches.
A thicker fabric layer can increase the gap between the magnetic parts and may reduce their attraction. Simply buying a stronger magnet is not a complete answer: the grip must work without leaving an unacceptable impression on the garment.
Ask the seller: “Was that rating measured by pulling the parts apart, or by checking whether the complete brooch slips on fabric? What fabric and thickness were used?” If only the magnet’s pull-force number is available, the wearing result remains unverified.
For clips, inspect the jaws before trusting “clip-on.” Some clip mechanisms have teeth; a historical example in the Genesee Country Village & Museum collection has an alligator-style fastening. A clip is therefore not automatically a smooth, non-piercing alternative.
Even a smooth clip needs a suitable place to grip. If positioning it requires bunching the middle of a blouse into its jaws, the attachment itself changes the drape. If the jaws struggle to accept a thick edge, forcing them closed is not a good fit.
Magnetic fastenings also need a wearer-specific check. For people with a pacemaker or implanted defibrillator, the American Heart Association advises keeping magnets at least 6 inches from the implant. Follow the device clinic’s guidance before choosing a magnetic accessory for the chest area.
For an existing brooch, also confirm how any converter attaches to its back. A fastening that works on one design is not automatically compatible with another.
How to Check a Brooch Before Wearing It Out
Judge the brooch on the outfit as it will actually be worn. A piece that sits neatly on a jacket laid flat may pull differently once the lapel curves over the body.
1. Inspect the fastening and the intended spot first.
Open and close the fastening before attaching it. Look for a damaged pin tip, rough edges, loose fittings or a catch that does not stay closed. Have doubtful hardware checked rather than using the garment to find out whether it works.
Inspect the fabric too. Note existing holes, pulled threads and worn patches so they are not mistaken for new damage. A close photo can help with the later comparison.
2. Attach it while the garment is supported.
Where practical, take the garment off and support the area on a clean surface. Keep the fabric clear of skin when inserting a pin. The fastening should close as intended without forcing the needle through resistant material or bunching fabric to make the parts meet.
If the position needs changing, release the fastening and remove it carefully. Do not drag a partly inserted pin sideways through the cloth.
3. Check normal movement, not just the mirror pose.
Put the garment on, stand naturally, sit down and move the arms as the outfit requires. Check whether a bag strap or outer layer will press on the brooch. There is no need to tug or shake it deliberately.
Return to the original posture and compare: has the brooch shifted, tipped farther forward or pulled the surrounding fabric out of shape? Remove it if the fastening loosens, holes begin to stretch or threads catch. Repeatedly nudging it back into place hides the problem rather than resolving it.
4. Support the weight before releasing the fastening.
Hold the brooch so it cannot drop or twist while it is being removed. Open a clip before moving it off the fabric. For a pin, release the point and withdraw it carefully; stop if a thread catches. With magnetic fittings, control both halves rather than pulling on the garment.
Check the area again after removal, including the inside. Look for enlarged holes, lifted threads, pressure marks or folds that remain. A brooch that stayed attached has only passed one part of the check.
A short try-on can reveal a poor pairing, but it cannot prove that hours of wear will leave no marks. Recheck during wear, especially after the brooch has been pressed by a coat or bag strap.
Can You Remove Brooch Holes, Snags and Pressure Marks?
A tiny mark can tempt someone to rub the fabric, snip off a loose thread or reach for the iron. Pause first: threads pushed out of place, broken threads and a flattened surface need different treatment. A hole becoming less visible does not necessarily mean the fabric is undamaged.
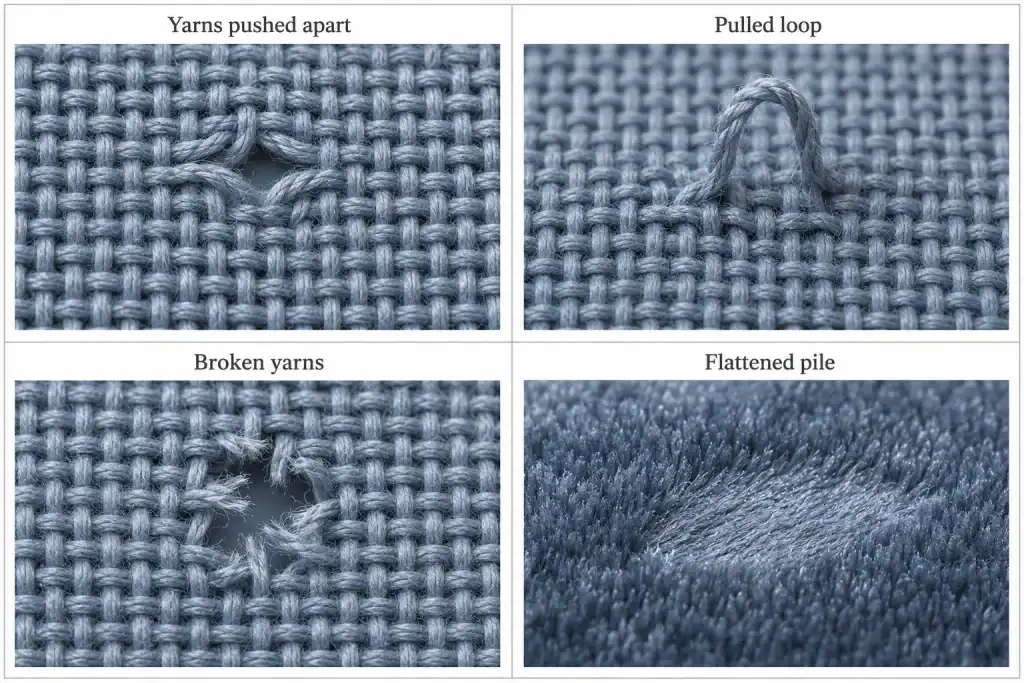
Remove the brooch and support the garment on a clean surface. Look at both sides in good light, using a close-up photo or magnifier if helpful. Do not stretch the area to make the hole easier to see. The clues below help describe the problem; they cannot reveal every damaged fiber.
Illustrated examples of displaced yarns, a pulled loop, broken yarns and flattened pile. Similar-looking marks can require different treatment.
| What is visible? | What it may mean | What to do next |
|---|---|---|
| A small gap with threads appearing to bend around it | The yarns—the threads that form the fabric—may have been pushed apart. | Remove the load and leave the area undisturbed first. If the opening remains, ask a garment repair specialist whether the yarns can be realigned. Do not pull the cloth to force the gap closed. |
| A raised loop or pulled thread, sometimes with puckering nearby | Part of a yarn may have been drawn out of the surrounding fabric. | Do not cut the loop or pull it tight. Cutting can turn an intact yarn into broken ends. Ask whether the displaced length can be worked back into the fabric. |
| Broken ends, fraying or a tear | Some of the fabric’s structure has been broken. | Stop using that spot for the brooch. Repair may involve darning or reweaving—rebuilding the damaged area with thread. Ironing cannot reconnect broken yarns. |
| A shiny patch or flattened velvet, without an obvious hole | Surface yarns may have shifted, or the pile—the short raised fibers—may have been crushed. | Do not press the patch flat to “smooth it out.” Ask someone familiar with that fabric about treatment; a change in sheen is not necessarily an ordinary crease. |
Steam is not a universal pinhole repair. The care label sets limits on heat and other treatments; it does not prescribe a repair method. Even when ironing is permitted, that does not establish that heat or pressure will restore a distorted surface.
For a persistent mark, send a repair specialist photos of both sides and the care label. Explain how the brooch was attached and anything already tried. Ask two separate questions: “Can the appearance be improved?” and “Would this area be suitable for fastening a brooch again?”
Those answers may differ. Do not hide a damaged spot by pinning the same brooch over it: the mark may disappear from view while the weakened area takes the load again.
What Should You Ask Before Buying a Brooch?
A product page may show exactly how a brooch looks while leaving out what matters for wearing it. “Lightweight” gives no actual weight, and a close-up of the front reveals little about the fastening.
Start with the garment and the intended position. That gives the seller something specific to assess. A useful message is:
“I’m considering this brooch for [garment], worn at [position]. The fabric is [description], with [lining or no lining]. I’ve attached a close-up and a wider photo.
Could you confirm its total weight in grams, including any removable back piece, and its dimensions? Please send clear back and side views showing the fastening.
Have you checked it on a similar fabric? If so, how was it attached, how long was it worn and was the fabric checked after removal?
What does your return policy allow if it proves unsuitable for this outfit?”
Describe what the cloth is like, even if its technical name is unknown: thin and slippery, soft and stretchy or firm and structured. Photos provide context, but they cannot establish the fabric’s strength.
Read the answer for its limits. “Suitable for wool” still leaves out whether the seller means a fine knit or a structured jacket. Look for the garment, attachment and checks behind the recommendation. A wear photo alone does not show movement or the fabric after removal. If the seller has not checked a comparable combination, treat its suitability as unconfirmed.
The next decision depends on the purchase:
- For a particular occasion outfit: treat the clothing as the fixed requirement. If it cannot tolerate a puncture or visible mark, do not buy a pin-style brooch on the assumption that a backing pad will make it suitable. For rented or borrowed clothing, confirm what the owner permits before trying any fastening.
- For regular wear across several outfits: identify the garments that will actually get the most use. Ask about those combinations rather than expecting one brooch to suit every blouse, sweater and coat. Any alternative fastening needs its own fit check.
- For a gift: if the recipient’s intended outfit is unknown, confirm the exchange arrangements and include the fastening instructions. Avoid presenting it as suitable for every fabric.
Check return deadlines, condition requirements and costs before ordering. Clarify what inspection or try-on is allowed; a return option does not make a delicate garment safe to experiment on. Save the listing and the seller’s answers.
For brands commissioning a brooch, put the intended garments into the sample brief. Agree on the fastening, its position and any backing or adapter. Check samples on fabrics typical of the intended clothing, recording movement and the fabric’s condition after removal. Approval of the front design alone leaves the wearing question unanswered.
A Final Checklist for Wearing a Brooch Properly
To wear a brooch properly and protect your clothes, choose suitable fabric, secure the fastening and watch for changes in the brooch’s position or the surrounding fabric. A closed clasp is only one part of that check.
| Stage | What to do | When to stop or change the plan |
|---|---|---|
| Before attaching it | Choose an undamaged area of fabric suited to the fastening. Check the pin tip, catch or other fitting for damage. | If the garment should not be punctured, do not use a pin simply because a backing pad is available. Any alternative must also suit the fabric and the wearer. |
| When fastening it | Support the garment, keep the pin clear of skin and close the fastening fully without forcing it. | Stop if the pin meets resistance, a thread catches or the fabric must be bunched or stretched to make the fastening fit. |
| During wear | Check after normal movement: does the brooch stay in its intended position, and does the surrounding fabric retain its shape? | Remove it if the fastening loosens, the brooch increasingly tips or the fabric develops stretched holes, snags or a new downward pull. |
| When taking it off | Support the brooch’s weight, release the fastening completely and remove it gently. Inspect both sides of the fabric. | If a thread catches, stop pulling. If a mark or damaged area remains, do not pin the brooch over it to hide the problem. |
Recheck after a coat or bag strap presses against the brooch. A good initial fit does not establish that a full day of wear will leave no marks.
If keeping the brooch upright requires pulling the clothing out of shape, change the location or the pairing. Remove it before repositioning, and avoid further trials on a damaged area. The aim is a brooch that sits as intended while the garment keeps its natural shape.
Sources
- Canadian Conservation Institute, Caring for textiles and costumes, on fabric structure, distortion under load, snagging and surface damage.
- OpenStax, Physics, “2.1 Relative Motion, Distance, and Displacement”, on comparing movement against a reference.
- OpenStax, College Physics 2e, “9.3 Stability”, on weight distribution and stable or unstable balance.
- OpenStax, University Physics Volume 1, “10.6 Torque” and “6.2 Friction”, on turning effects and resistance to sliding.
- Genesee Country Village & Museum, Brooch, object 2025.16.197, documenting a historical clip fastening with teeth.
- American Heart Association, Devices That May Interfere With ICDs and Pacemakers, particularly the guidance on magnets.
- National Museums Scotland, Object handling, on preparation and checking condition before handling.
- GINETEX, Care symbols, on garment-specific ironing limits and restrictions on steam.
- Innovation, Science and Economic Development Canada, Office of Consumer Affairs, Online shopping, on checking product dimensions, weight, materials and terms of sale.
- U.S. Federal Trade Commission, Online Shopping, on return policies and keeping product information and seller communications.
- SINGER, Roller Presser Foot, sewing guidance on permanent pinholes in leather, plastic and laminated fabrics.
- GORE-TEX, Frequently Asked Questions, guidance on garment alterations and unsealed needle holes affecting waterproof protection.
- K&J Magnetics, Testing Magnet Strength and How Much Will a Magnet Hold?, on steel-plate pull tests, gaps and resistance to sliding.
- Arc’teryx, How to Repair Arc’teryx Apparel: Guide, Cost & Warranty Policy, section “Fixing pulls and snags on soft fabrics,” on avoiding cutting snagged loops.
- Reddit, r/Beading, discussion and follow-up by u/Greenlittlebastards about a narrow brooch and felt placed inside the garment. An individual wearer’s report, not a controlled test.